PyCharm Professional Docker configuration
These instructions show how to configure PyCharm Professional for SKA control system development using the SKA Docker images. PyCharm can be configured to use the Python interpreter inside a Docker image, which allows:
- development and testing without requiring a local Tango installation;
- the development environment to be identical to the testing and deployment environment, eliminating problems that occur due to differences in execution environment.
Follow the steps below to configure PyCharm to develop new code and run tests for the tango-example project using the Docker images for the project.
Prerequisites
Make sure that the following prerequistes are met:
- Docker is installed, as described on the page Docker Docs.
- PyCharm Professional must be installed. PyCharm Community is not sufficient!
- You have basic familiarity with PyCharm. If this is the first time you have used PyCharm, follow the First Steps tutorials so that you know how to use PyCharm to develop, debug, and test a simple Python application using a local Python interpreter.
Clone the tango-example project
PyCharm allows you to check out (in Git terms clone) an existing repository and create a new project based on the data you’ve downloaded.
- From the main menu, choose VCS | Checkout from Version Control | Git, or, if no project is currently opened, choose Checkout from Version Control | Git on the Welcome screen.
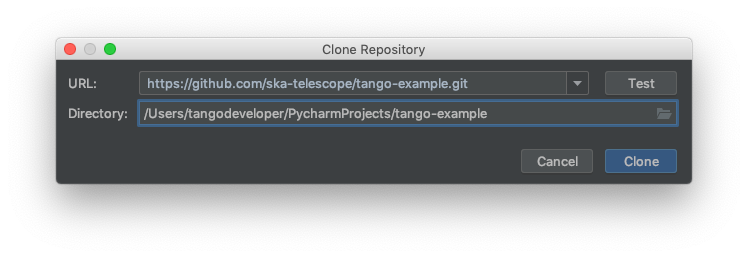
- In the Clone Repository dialog, specify the URL of the tango-example repository (you can click Test to make sure that connection to the remote can be established).
- In the Directory field, specify the path where the folder for your local Git repository will be created into which the remote repository will be cloned. The dialog should now look similar to this:
- Click Clone, then click Yes in the subsequent confirmation dialog to create a PyCharm project based on the sources you have cloned.
Build the application image
With the source code source code checked out, the next step is to build a Docker image for the application. This image will contain the Python environment which will we will later connect to PyCharm.
Begin a terminal session in the cloned repository directory and build the image:
mypc:tango-example tangodeveloper$ make build
docker build  -t nexus.engageska-portugal.pt/tango-example/powersupply:0.1.0-65c0927 . -f Dockerfile --build-arg DOCKER_REGISTRY_HOST=nexus.engageska-portugal.pt --build-arg DOCKER_REGISTRY_USER=tango-example
Sending build context to Docker daemon  450.6kB
Step 1/4 : FROM nexus.engageska-portugal.pt/ska-docker/ska-python-buildenv:latest AS buildenv
latest: Pulling from ska-docker/ska-python-buildenv
177e7ef0df69: Pull complete
d9178ba39f54: Pull complete
a1c86587108f: Pull complete
072891bac9fb: Pull complete
f7ec90efdf53: Pull complete
877eee992e82: Pull complete
eb71e945bf43: Pull complete
6b50707e167c: Pull complete
6bb56dff13ba: Pull complete
8c3fe19826ab: Pull complete
4377cf316b50: Pull complete
209febb6128f: Pull complete
41eb9ed8ebf6: Pull complete
Digest: sha256:a909606b3d0d4b01b5102bd0e4f329d7fd175319f81c8706493e75504dd0439e
Status: Downloaded newer image for nexus.engageska-portugal.pt/ska-docker/ska-python-buildenv:latest
# Executing 3 build triggers
 ---> Running in c98b60355c16
Installing dependencies from Pipfile.lock (48af56)…
Removing intermediate container c98b60355c16
 ---> 52007c1fb364
Step 2/4 : FROM nexus.engageska-portugal.pt/ska-docker/ska-python-runtime:latest AS runtime
latest: Pulling from ska-docker/ska-python-runtime
177e7ef0df69: Already exists
d9178ba39f54: Already exists
a1c86587108f: Already exists
072891bac9fb: Already exists
f7ec90efdf53: Already exists
0f3a4ec2943c: Pull complete
Digest: sha256:9adf4810777d14b660b99fbe2d443f8871cc591313c8ac436dacee38de39160e
Status: Downloaded newer image for nexus.engageska-portugal.pt/ska-docker/ska-python-runtime:latest
# Executing 6 build triggers
 ---> Running in edf8f96df923
Removing intermediate container edf8f96df923
 ---> Running in 246002732edf
Removing intermediate container 246002732edf
 ---> 1ac7b8a31b0f
Step 3/4 : RUN ipython profile create
 ---> Running in 6eccb0302ab8
[ProfileCreate] Generating default config file: '/home/tango/.ipython/profile_default/ipython_config.py'
Removing intermediate container 6eccb0302ab8
 ---> d428fd337258
Step 4/4 : CMD ["/venv/bin/python", "/app/powersupply/powersupply.py"]
 ---> Running in e667e6c25b0b
Removing intermediate container e667e6c25b0b
 ---> 76e5e0e2e4b9
[Warning] One or more build-args [DOCKER_REGISTRY_HOST DOCKER_REGISTRY_USER] were not consumed
Successfully built 76e5e0e2e4b9
Successfully tagged nexus.engageska-portugal.pt/tango-example/powersupply:0.1.0-65c0927
docker tag nexus.engageska-portugal.pt/tango-example/powersupply:0.1.0-65c0927 nexus.engageska-portugal.pt/tango-example/powersupply:latest
mypc:tango-example tangodeveloper$
The last lines of terminal output displays the name and tags of the resulting images, e.g.,
...
Successfully built 76e5e0e2e4b9
Successfully tagged nexus.engageska-portugal.pt/tango-example/powersupply:0.1.0-65c0927
docker tag nexus.engageska-portugal.pt/tango-example/powersupply:0.1.0-65c0927 nexus.engageska-portugal.pt/tango-example/powersupply:latest
In the example above, the image name is tagged as nexus.engageska-portugal.pt/tango-example/powersupply:0.1.0-65c0927 and nexus.engageska-portugal.pt/tango-example/powersupply:latest. Take a note of the image tagged as latest as you will need it when configuring the remote interpreter.
Configure the remote interpreter
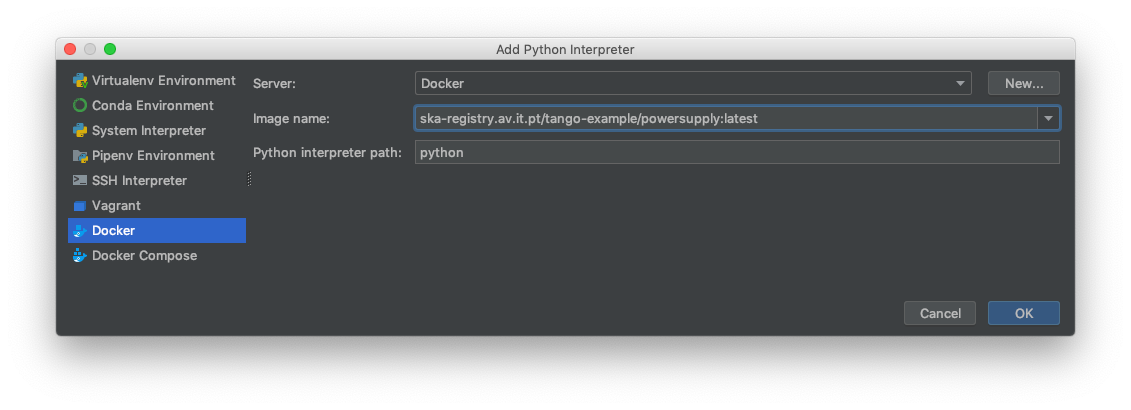
Following the official PyCharm documentation, configure Docker as a remote interpreter using the image you just created. The ‘Add Python Interpreter’ dialog should look similar to this:
As a result, the Python interpreter Preferences dialog should look something like this:
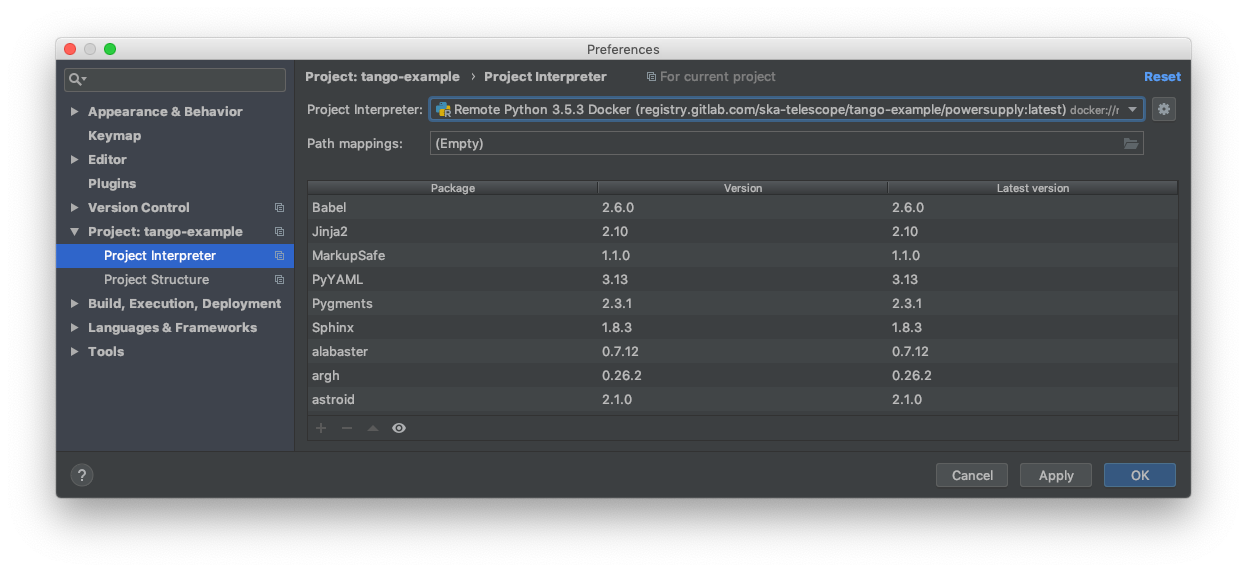
Click ‘OK’ to apply your changes.
Note
It is recommended to use the remote interpreter in the image tagged as :latest rather than the image tagged with a git hash, e.g., :0.1.0-65c0927. The :latest version will always point to the most recent version of the image, whereas the hash-tagged image will be superceded every time you rebuild.
You can now navigate through the project. As an exercise, open the source code for the PowerSupply class, which is
defined in powersupply/powersupply.py. Notice that the IDE notifications and intellisense / code completion are now
based on information gathered from the remote Docker interpreter. Below an import statement, try typing
from tango import and activate code completion (ctrl+space). Notice how the tango packages installed in the
Docker image are suggested to complete the statement.
Whenever you change the Python environment, for example by adding or removing dependencies in Piplock, after rebuilding the Docker image you should regenerate the project skeletons to make PyCharm aware of the changes. To do this, select File | Invalidate Caches / Restart… from the main menu.
Running unit tests
The tango-example project illustrates two types of unit test:
- Self-contained unit tests that execute within the confines of a single Docker container. These tests use the Tango class DeviceTestContext, which provides a mock connection to a Tango database. In the tango-example project, these tests are found in tests/test_1_server_in_devicetestcontext.py.
- Unit tests that exercise a device in a real Tango environment, with connections to a Tango database and other devices. utilise require a connection. In the tango-example project, these tests are found in tests/test_2_test_server_using_client.py.
This tutorial illustrates how to run the self-contained unit tests described in 1. The second type of unit tests require a docker-compose PyCharm configuration, which is not described here.
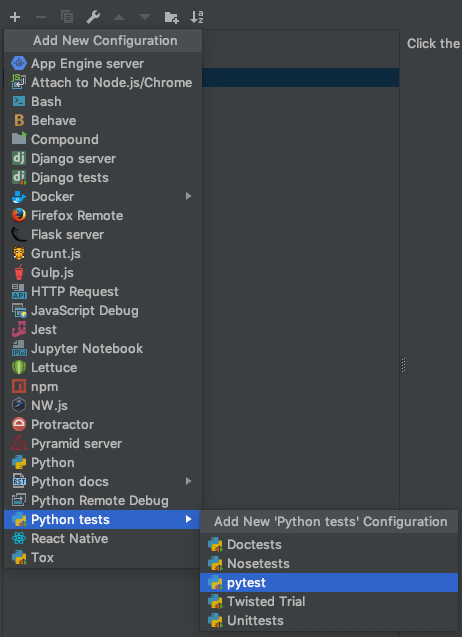
From the main menu, choose Run | Edit Configurations… and click on the ‘+’ button to add a new configuration. From the menu that appears, select Python tests | pytest to add a new pytest test configuration. The menu selection looks like this:
- Change the Target radio button to ‘Module Name’. Click ‘…’ to select the target, choosing test_1_server_in_devicetestcontext as the module to be tested.
- Select ‘Project Default’ as the Python interpreter for this configuration.
Note
If you change the project default interpreter to another configuration - a Docker Compose configuration, for instance - then you may want to revisit this run/debug configuration and explicitly select the Docker :latest interpreter rather than use the project default.
The configuration dialog should look like similar to this:
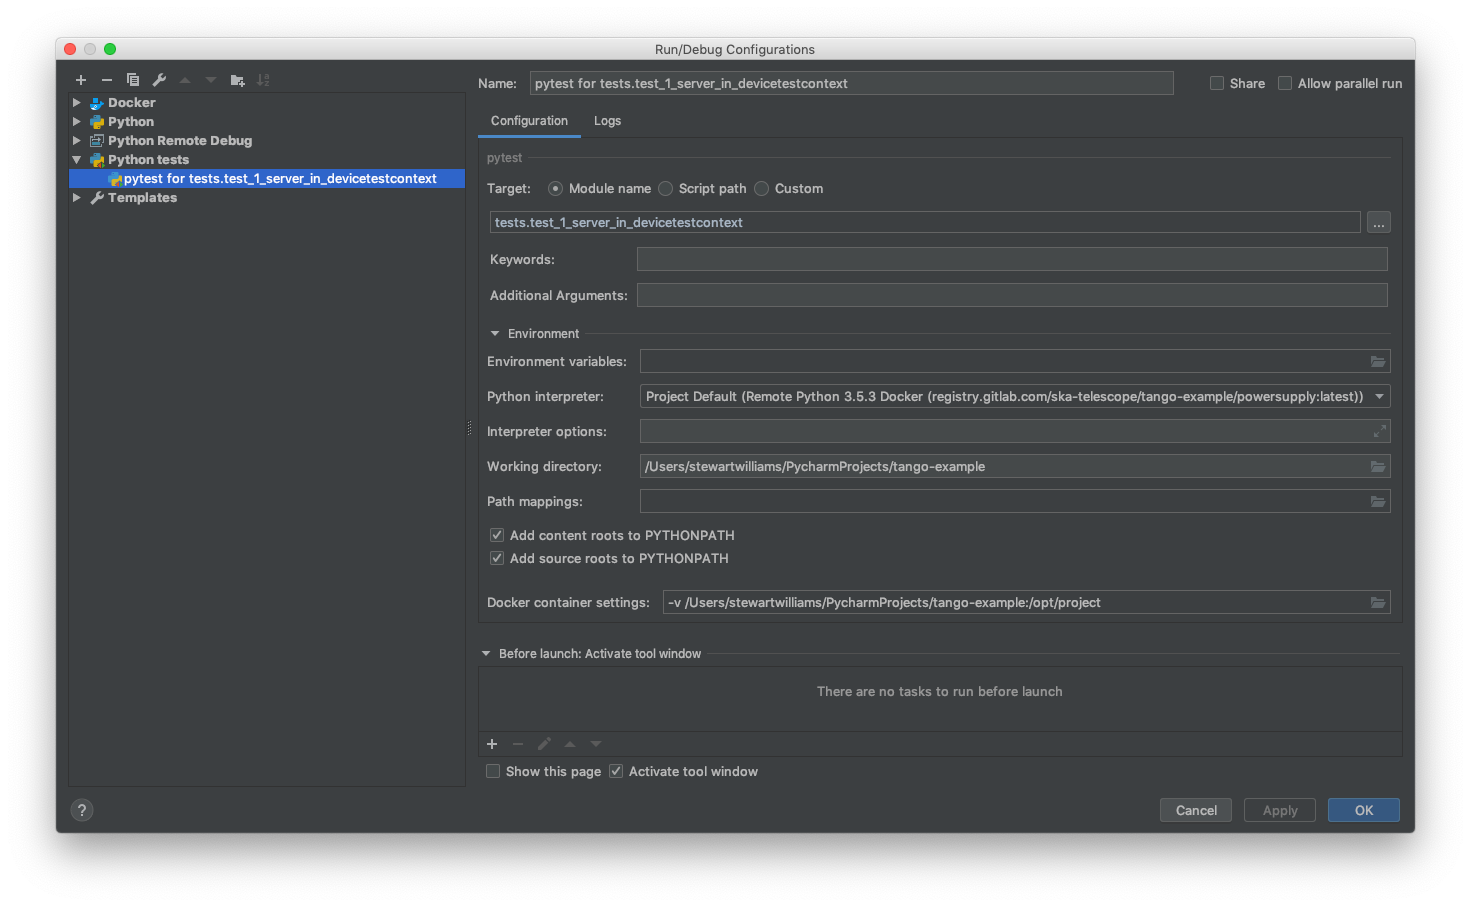
Click ‘OK’ to accept your changes.
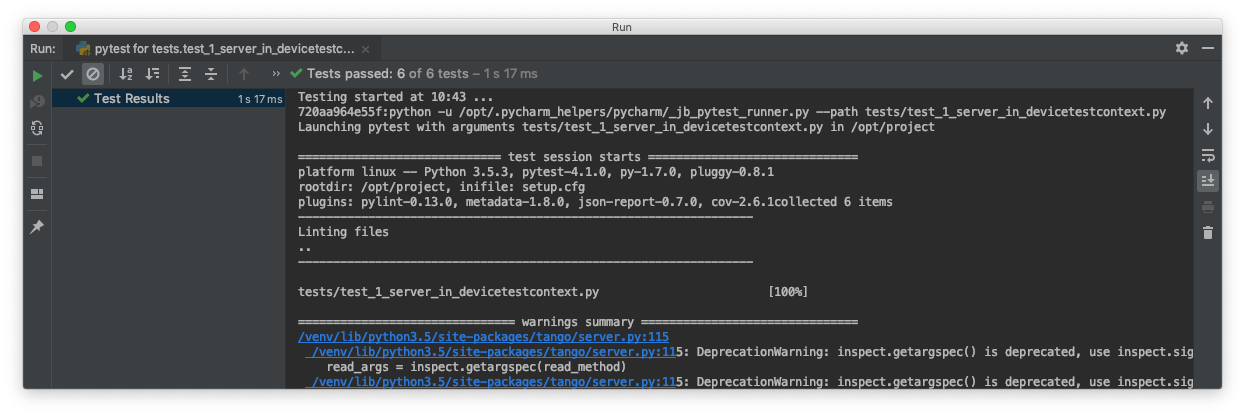
From the main menu, choose Run | Run…, then from the Run dialog that opens, select the configuration you just created. The unit tests will execute, with the results displayed in PyCharm’s Run panel. The results will look like this:
Debugging Configuration
Note
The coverage module is not compatible with the PyCharm or Visual Studio Code debugger and must be disabled
before any debugging session. Do so by editing setup.cfg, commenting out the addopts=... line of the
tool:pytest section so that it looks like this:
[tool:pytest]
testpaths = tests
#addopts = --cov=powersupply --json-report --json-report-file=htmlcov/report.json --cov-report term --cov-report html --cov-report xml --pylint --pylint-error-types=EF
PyCharm has a debug mode that allows breakpoints to be added to code and the runtime state of the device examined. Refer to the official PyCharm documentation for comprehensive documentation on how to add breakpoints and run in debug mode.
The steps in the official documentation can also be used to debug and interact with ah Tango device, using the
configuration set up in the previous section as the basis for the debug configuration. However, full breakpoint
functionality requires some workarounds. Breakpoints set outside device initialisation code (i.e., outside
__init__() and init_device()) only function if the Tango device uses asyncio green mode. In non-asyncio
modes, Tango creates new Python threads to service requests. Unfortunately these threads do not inherit the debugging
configuration attached by PyCharm.
For working breakpoints, there are two solutions:
- the device must be converted to use asyncio green mode;
- add
pydevdto your Piplock as a project dependency, rebuild the Docker image and refresh the project skeletons, then addpydevd.settrace()statements where the breakpoint is required. For example, to add a breakpoint in thePowerSupply.get_current()method, the code should look like this:
def get_current(self):
    """Get the current"""
    import pydevd
    pydevd.settrace()  # this is equivalent to setting a breakpoint in IDE
    return self.__current
Troubleshooting
SegmentationFaults when using DeviceTestContext
Unit tests that create a new DeviceTestContext per test must run each DeviceTestContext in a new process to avoid SegmentationFault errors. For more info, see:
Errors when mixing test types
Running DeviceTestContext tests after test that use a Tango client results in errors where the DeviceTestContext gets stuck in initialisation. One workaround is to set the filenames so that the DeviceTestContext tests run first.