Software Package Release Procedure
Versioning Procedure
As part of our goal to align all developmental efforts to one standard, we have documented a procedure of how we would like all the SKA developers to version their releases and what process to follow in ensuring that they are able to make use of the existing Gitlab CI/CD pipeline to automate the building of python packages, for now, and have them published on the SKA pypi registry which is hosted on Nexus.
Python Packaging Procedure
How to mark a release
A developer should make use of the git annotated tags to indicate that this current commit is to serve as a release. For example:
$ git tag -a "1.0.0" -m "Release 1.0.0. This is a patch release that resolves
  issue <JIRA issue>."
After that is complete, then the tag needs to be published to the origin:
$ git push origin <tag_name>
Caution
The format of the tag should be N.N.N
Minimum requirements to meet
For proper Python packaging, the following metadata must be present in the repository:
- Package name
- Package version
- Github repo url
- Description of the package
- Classifiers
All of this should be specified in the setup.py module that lives in the root directory.
Additional metadata files should be included in the root directory, that is the:
- README.{md|rst} - A description of the package including installation steps
- CHANGELOG.{md|rst} - A log of release versions and the changes in each version
- LICENSE - A text file with the relevant license
Building packages
The following command will be executed in order to build a wheel for a Python package:
$ python setup.py sdist bdist_wheel
This will form part of the CI pipeline job for the repository so that it can be build automatically. The developer should add this build step in their .gitlab-ci.yml file, for example:
build_wheel for publication: # Executed on a tag:
  stage: build
  tags:
    - docker-executor
  script:
    - pip install setuptools
    - python setup.py egg_info -b+$CI_COMMIT_SHORT_SHA sdist bdist_wheel # --universal option to used for pure python packages
This will build a Python wheel that will be published to Nexus. For developmental purposes one can replace the -b+$CI_COMMIT_SHORT_SHA
command line option with -b+dev.$CI_COMMIT_SHORT_SHA to have the wheel built on each commit.
Publishing packages to Nexus
Provided that the release branch has been tagged precisely as described in the above sections then the CI job will be triggered by the availability of the tag to publish the Python wheel to the SKA pypi registry on Nexus.
publish to nexus:
  stage: publish
  tags:
    - docker-executor
  variables:
    TWINE_USERNAME: $TWINE_USERNAME
    TWINE_PASSWORD: $TWINE_PASSWORD
  script:
    # check metadata requirements
    - scripts/validate-metadata.sh
    - pip3 install twine
    - twine upload --repository-url $PYPI_REPOSITORY_URL dist/*
  only:
    variables:
       - $CI_COMMIT_MESSAGE =~ /^.+$/ # Confirm tag message exists
       - $CI_COMMIT_TAG =~ /^((([0-9]+)\.([0-9]+)\.([0-9]+)(?:-([0-9a-zA-Z-]+(?:\.[0-9a-zA-Z-]+)*))?)(?:\+([0-9a-zA-Z-]+(?:\.[0-9a-zA-Z-]+)*))?)$/ # Confirm semantic versioning of tag
Installing a package from Nexus
For developers who want to install a python package from the SKA pypi registry hosted on Nexus, they should edit the project’s Pipfile to have the following section(s), for example:
[[source]]
url = 'https://nexus.engageska-portugal.pt/repository/pypi/simple'
verify_ssl = true
name = 'nexus'

[packages]
'skaskeleton' = {version='*', index='nexus'}
Helm Chart Packaging, Publishing and Sharing
Working with a Helm Repository
Working with a Helm chart repository is well-documented on The Official Helm Chart Repository Guide.
Adding (our) repository
Note
Our Helm chart repository URL is https://nexus.engageska-portugal.pt/repository/helm-chart
In order to add the Helm chart repo to your local list of repositories, run
$ helm repo add [REPONAME] https://nexus.engageska-portugal.pt/repository/helm-chart
where [REPONAME] is a name you choose to identify the repo on your local machine. In order to standardise, we would recommend you use skatelescope.
Search available charts in a repo
To browse through the repo to find the available charts, you can then say (if, for example, you decided to name the repo skatelescope), to see output similar to this:
$ helm search skatelescope
NAME                          CHART VERSION   APP VERSION     DESCRIPTION
skatelescope/sdp-prototype    0.2.1           1.0             helm chart to deploy the SDP Prototype on Kubernetes
skatelescope/test-app         0.1.0           1.0             A Helm chart for Kubernetes
skatelescope/webjive          0.1.0           1.0             A Helm chart for deploying the WebJive on Kubernetes
To install the test-app, you call helm install the-app-i-want-to-test skatelescope/test-app to install it in the default namespace. Test this with kubectl get pods -n default.
Update the repo
Almost like a git fetch command, you can update your local repositories’ indexes by running
$ helm repo update
Note: this will update ALL your local repositories’ index files.
Package and publish Helm Charts to the SKA Helm Chart Repository
Package a chart
Packaging a chart is relatively trivial. Let’s say you create a chart called my-new-chart, with the following directory structure:
$ tree
  my-new-chart/
  ├── Chart.yaml
  ├── charts
  ├── templates
  │   ├── NOTES.txt
  │   ├── _helpers.tpl
  │   ├── deployment.yaml
  │   ├── ingress.yaml
  │   ├── service.yaml
  │   └── tests
  │       └── test-connection.yaml
  └── values.yaml
You can now package it with the simple command helm package my-new-chart and it will create the package file:
$ helm package my-new-chart
$ tree
  my-new-chart-0.1.0.tgz
  my-new-chart/
  ├── Chart.yaml
       ...
  └── values.yaml
Now, in order to publish the chart, you can simply run a curl command with an --upload-file flag:
$ curl -v -u $USERNAME:$PASSWORD --upload-file new-helm-package-v-0.1.0.tgz --url https://nexus.engageska-portugal.pt//repository/helm-chart/
Note
You will of course need credentials ($USERNAME and $PASSWORD) to run the above curl command with, and this user should have privileges for reading and writing on the Repository. We have a Gitlab Runner already set up with a user that has the required privileges - see how to do this below.
If you now run helm repo update you (or your colleagues) should see your new application also listed under the repo:
$ helm search skatelescope
NAME                          CHART VERSION   APP VERSION     DESCRIPTION
skatelescope/sdp-prototype    0.2.1           1.0             helm chart to deploy the SDP Prototype on Kubernetes
skatelescope/test-app         0.1.0           1.0             A Helm chart for Kubernetes
skatelescope/webjive          0.1.0           1.0             A Helm chart for deploying the WebJive on Kubernetes
skatelescope/my-new-chart     0.1.0           1.0             A Helm chart for deploying the WebJive on Kubernetes
Bulk package and publish using Gitlab CI
Read the Helm documentation (note: this link is for Helm v2 because we are still using it) in order to learn how to publish your application to a Helm repository. This is an example of a branch-specific job in the CI pipeline with manual input required. See comments below the code block.
1 2 3 4 5 6 7 8 9 10 11 12 13 14 15 16 | stages:
- helm-publish
...
publish-chart:
stage: helm-publish
when: manual # the script will require you to specify the name of the chart that you want to package - CHART_NAME
only:
- helm-publish
tags:
- helm-repoman
script:
- cd charts
- if [ $CHART_NAME == 'all' ]; then for d in */; do helm package "$d"; done; else helm package $CHART_NAME; fi
- for f in *.tgz; do curl -v -u $RAW_USER:$RAW_PASS --upload-file $f $RAW_HOST/repository/helm-chart/$f; rm $f; done
|
Here are a few comments, referring to the line numbers above:
ln 1: Remember to add the stage at the top of your .gitlab-ci.yml
ln 8: Setting when: manual will cause the pipeline to wait for the user to trigger the job.
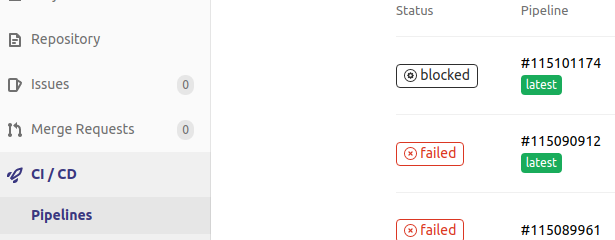
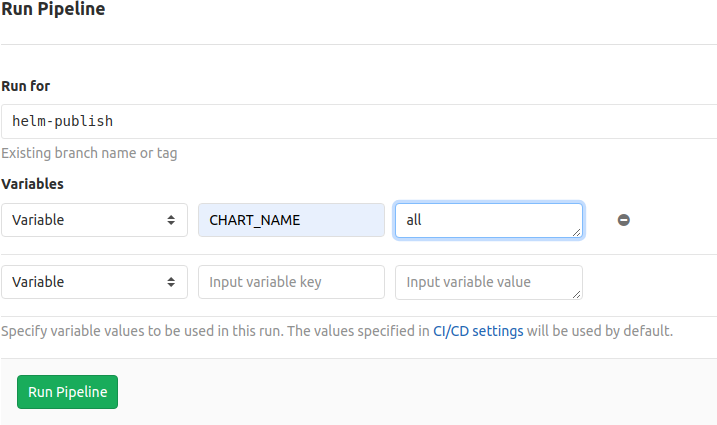
When you try to run the blocked job for the first time, Gitlab will ask you to input variables - see next image. You need to specify CHART_NAME and use the exact name of the chart, for instance my-new-app.
You can either specify the chart name that is to be published, or input all so that every chart in the top-level charts/ folder is published.
ln 9: Restricting the job to run only on the helm-publish branch is suggested because this job is run manually and thus will block a pipeline, waiting for manual input, which is not necessarily good for CI, especially if publishing new charts is not required.
ln 11: The runner’s name is helm-repoman - it’s available for all projects in the SKA group.